myTaste.com
ll Cibo é L'essenza Della Vita....

"The rooms that you use on a daily basis are the rooms people will always want to sit in, because they have soul." --Bunny Williams

“VIVERE SENZA RIMPIANTI” LIVE WITHOUT REGRETS

"If you want to live forever and ever, drink wine and eat maccheroni." ~~~Sicilian Proverb

Wednesday, June 16, 2010

A Summer Dessert Tablescape and Lemon Meringue Puff Pastries


Buona Sera Amici!

Oh my- a crazy day here at Casa Bramasole. But we would never miss Susan's party at Between Naps on the Porch- it's Tablescape Thursday!!

I haven't been home much lately- there are changes in the works at Bramasole (more on that later)! But today I worked at home- insanity reigned- and since the kids are home for the summer, I decided not to waste a minute of memory-making time. It rained HARD last night, but the sun was trying very hard to peek out this morning. What better time for a dessert break with my lovely daughter? Her creative mind is churning with ideas for Father's Day this weekend and we spent some time chatting about an upcoming family trip. 

I LOVED it!

A tiny table for 2....


The table is topped with a vintage 50s card table cloth. These were made with little ties at the corners so that the cloths would stay flat during a raucus game of Canasta!
I pulled the bottom cloth through at the corners

a pillow made with a vintage initial hanky...


and one made with a vintage needlepoint


Each corner has a motif. This little lovely little Miss is carrying a lantern. Isn't the heart adorable??


By the way- it's quite obvious I'm still learning this picture stuff. Note to self- make sure your feet aren't in the picture!

One place setting is handpainted glass...


and one is painted pottery. The colors echo the flowers around us


See my little potted fig tree? :)


Overflowing planters still wet and droopy from the night's downpour


Another motif- a hanging lantern- the suit is Diamonds


Citrus- the colors of summer


A lantern of Clubs...


Lemon Meringue Puff Pastries


One of my very few hydrangeas this year :(   Mr B. inadvertantly pruned at the wrong time


Here comes the sun...


Silver rose napkin rings holding vintage monogrammed linen napkins- I was so excited when I found these- they're our initial!


So relaxing- even a very short break is so good for the soul


Who do you think she's looking for?? The Queen of Hearts maybe??


A lovely break with my girl


I just have to show you my figs- I feel like a proud mama!


Please come join us sometime- we'd love to have you


Lemon Meringue Puff Pastries


1 package frozen puff pastry tarts- regular size or mini (I used mini here)

Bake as directed on package and cool. Remove tops and scoop out centers if necessary

Lemon Curd 
1 tsp. lemon zest, finely grated on a microplane 
4 large egg yolks, at room temperature
rounded 1/2 cup caster sugar 
scant 1/2 cup freshly squeezed and strained lemon juice (about 3 small lemons)
1/4 cup unsalted butter, cut in pieces 
a pinch of sea salt
In a saucepan, whisk the egg yolks and sugar until combined
Add the lemon juice, salt and cut up butter pieces and heat over medium-low heat, stirring continuously with a heat-proof rubber spatula.
The lemon curd will eventually thicken, coating the back of the spatula.  Do not boil or it may curdle. 
Strain and discard residue.  Add zest and stir.  Allow to cool.
ITALIAN MERINGUE
3  egg whites, at room temperature
1/2 teaspoon cream of tartar
1/4 cup caster sugar 
1 1/2 TBLSP water
In a standing mixer with a whisk attachment, whisk egg whites until foamy.  Add cream of tartar and continue whisking on medium-high speed until stiff peaks form.
In a heavy saucepan, heat sugar and water until dissolved.  Continue to cook the sugar until the soft ball stage. (240 degrees) Pour the cooked sugar into the stiffly beaten whites and beat until combined.

To assemble: Fill puff pastry tarts with lemon curd. Using pastry bag with star tip, spiral on meringue working from edges in to center. Either broil for a minute or so till tips turn golden (watch very carefully!! This burns quickly) OR do as I do and use a kitchen torch to gently brown the meringue.


Join us tomorrow for Foodie Friday at Gollum's place- and take the time to make some memories of your own 

As Always,

Buon Cibo, Buon Amici,

Pattie and Allie

Monday, June 14, 2010

Traditional Gnocchi for Meatless Monday!


Hi all!

Hope everyone had a wonderful weekend. It was a happy one here- we had family visiting for the weekend and a houseful of loud kids, but that's what makes my world a happy place!

Not too much time for blogging tonight- I have a presentation to get ready for a client and nowhere near ready!

Tonight, for Meatless Monday, I made traditional potato gnocchi- a favorite of my Mom's and Allies. My Nonna was famouss for her light, delicious gnocchi and I'm quite proud to be able to replicate hers pretty closely :)

According to the emails I've been getting, it seems many of you find these little potato based pasta dumplings to be very intimidating. In reality, they're actually easier to make than home- made pasta. All it takes is a little practice, a ricer and the right potatoes. When my Nonna made gnocchi in Italy, she always boiled the potatoes. In Italy, gnocchi were usually made with old potatoes which were drier and made lighter gnocchi. I find I get much better results here by baking Russet potatoes- they're not too mushy, gummy, or mealy. 

Allie prefers hers with a light tomato sauce. I made mine tonight with a brown butter sage sauce-YUM!

My Nonna always made hers by rolling the dough off the tines of a fork. As a child that was my job and I spent many happy afternoons at her kitchen table making tray after tray of gnocchi and watching her skim them out of the pot as they floated. Many years ago when I was a new bride, a friend's mother brought me a gnocchi board from Italy and I used it till we moved to NC and it mysteriously disappeared. I went back to a fork till I walked into Kitchenworks one day and there it was- my board!

I'm a happy camper again


Nonna Norma's Gnocchi

Russet potatoes- I used 10 medium  sized ones today

2 egg yolks- this is optional. Sometimes I do, sometimes I don't. There are those that feel eggless gnocchi are lighter, but I'm not sure I necessarily agree. Mine are pretty light. I think the amount of flour has more importance

About 2 tablespoons of salt (I tried to measure today- I usually eyeball it)

about 3 cups of flour

Preheat oven to 375 degrees. Pierce potatoes and bake for about 1 hour till tender. Remove from oven and cool for 5 or 10 minutes. Carefully (I use a pot holder) peel and using a ricer (this is crucial in my opinion- it's what my Nonna used) press the potatoes into a large bowl. Stir in the salt, beaten egg yolks (if you're using them) and 2 cups of the flour. Stir in the rest of the flour and knead everything together for a minute. Do not overwork and the amount of flour may vary depending on the humidity and moisture in the potatoes. The dough should be just a little bit sticky.

Lightly flour a couple of tea towels on the counter. Break off a piece of dough about the size of a small grapefruit and roll it out into a long "snake" on the counter. With a sharp knife cut into inch long pieces. With floured hands, roll each piece off the tines of a fork or gnocchi board pushing it forward with your thumb- the traditional ridges and "curl" or shell shape that is formed are what captures the sauce. Lay the gnocchi on the towel as you form them. 

Bring a large pot of salted water to a rolling boil. Add the gnocchi in batches. In a minute or two they will float to the surface. Using a large skimmer remove them to a warmed serving platter, add your sauce, and enjoy!

Allie's


Mine


If you'd like to get some bonus recipes, be sure to become a fan of Bramasole on Facebook. Tonight we're posting a lovely poppy seed tea bread that has already almost disappeared since being made this morning!

As Always,

Buon Cibo, Buon Amici,

Pattie and Allie

Thursday, June 10, 2010

A Foodie Friday Photo Shoot!!


Hey y'all! Tutti a tavola!

That's "Southern" Italian, if you didn't know!

It means...we have a ton of leftovers, so everyone to the table!

It's Foodie Friday at Designs by Gollum and we had a real Foodie Day! Today we had a photographer from Chapel Hill Magazine in our kitchen taking pictures of me and Allie making some "summer foods".

What do you think?? Does this say summer to you?? As in July 4th?


The recipe the magazine is actually featuring is our Watermelon, Avocado, Feta Salad that we posted here but they asked for a display of summer foods (which are now all left over, so come on down!)

Mr Bramasole supervised the action


This is what a 16 year old does in the name of fashion. On a 94 degree Carolina day, she wears suede boots with her shorts...


Teaching her to use Mom's big knife


Ready to eat!


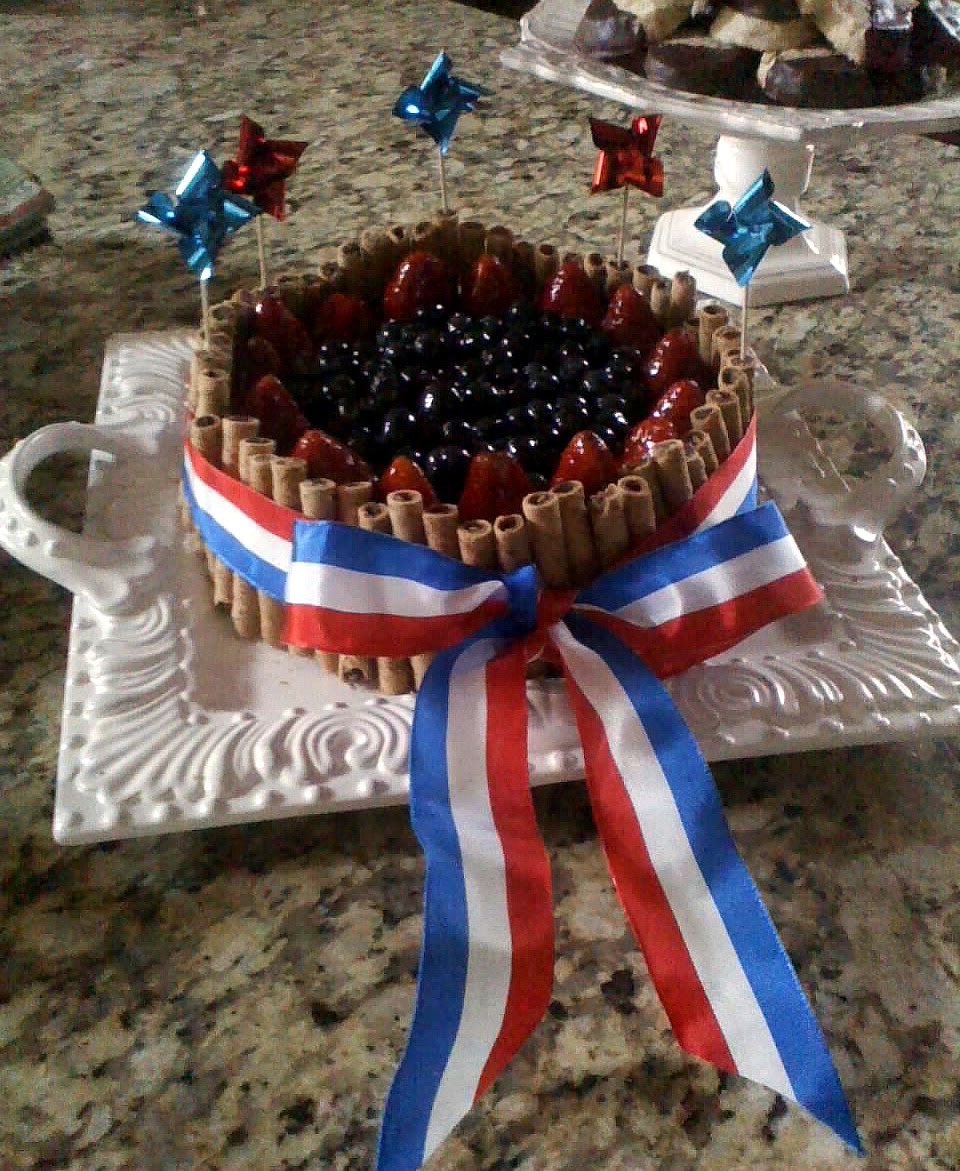
Strawberries and blueberries just scream summer and America!


Move over Paula Deen and Sons!


Isn't she cute??! 


Now I will admit to being known for my cheesecakes- they're a favorite dessert around here. Dense and creamy New York cheesecake, luscious ricotta cheesecake, chocolate cheesecake- I make them all. This particular recipe is a favorite of Allie's. It's the one she requests whenever  she gets to pick dessert. Feel free to use different fruit (we were going for patriotic here) or to swirl some preserves through the batter. You can make a crust if you choose, but I generally prefer to use ladyfingers or pirouettes as we did today.


Pattie's Famous Creamy Cheesecake

adapted from a recipe by Rose Levy Beranbaum that I clipped MANY years ago


all ingredients at room temperature.
grease an 8 inch springform pan, line bottom with a round of waxed paper and grease paper. Wrap pan well with heavy duty foil and place in a much larger roasting pan. Preheat oven to 350 degrees and put a pot of water on to boil

2 8 ounce packages of cream cheese
1 cup sugar
3 eggs (large or extra large)
3 TBLSP lemon juice
2 tsp vanilla
salt
3 cups sour cream
(If you're going to make a crust in the pan, add 1 TBLSP cornstarch to absorb any extra moisture and prevent sogginess)

Beat the cream cheese and sugar till very smooth and fluffy. Beat eggs in one at a time, then lemon juice, vanilla and cornstarch, if using. Add a pinch of salt and fold in sour cream till smooth. Pour into springform, add boiling water to roasting pan to about 1 1/2 inch depth, and bake for 45 minutes. Turn off oven (do NOT open door) and allow to set there for 1 hour. remove pan from roaster and remove foil. Place on rack over a pan (to catch any drips) and cool to room temperature. Cover and refrigerate overnight. 
Run a thin knife around edges and remove sides of springform. Lay a sheet of plastic wrap on a dinner plate and invert over cheesecake. Flip cake over and remove bottom, peeling off waxed paper. Place serving plate on cake and flip using the 2 plates to "sandwich the cake. Carefully lift off dinner plate and you should have no damage to your cake top!. Decorate top and sides as desired. I placed strawberries around the edges and brushed them with some of my strawberry jelly which I had melted over low heat. I then poured a container of blueberries in the melted jelly and stirred (off heat) to glaze them. Mound the berries in the center. I cut chocolate filled pirouette wafer cookies in half and stood them up around the cake (you may need a helper for this- they tend to fall over. I usually brush a tiny bit of the melted jelly on the cake sides to make it sticky) Wrap with a ribbon and tie a pretty bow. The fruits and ribbon can be changed to match the occasion and I have also used ladyfingers or a chocolate lattice (seen here ) to rim the cake. 


Have a fabulous weekend and join us at Michael's for the Foodie Friday fun! 

As Always,

Buon Cibo, Buon Amici,

Pattie and Allie

Wednesday, June 9, 2010

A Retro Tablescape Thursday and a Favorite Summer Dessert!


Oh. My Gosh.

Is it really Thursday already?? I am SO behind schedule here.

We're linking up to Susan's fabulous party at Between Naps on the Porch and looking forward to some down time tonight to browse all the wonderful inspiration.

Unfortunately, the table I had planned had to be put on the back burner as this week spun out of control.

It started last weekend with the kitchen painting I showed you in our last post, and waltzed right into the "last week of school chaos"!!

It's been a week of class trips, class parties, sleepovers, work, and tomorrow is the day the photographer is coming to take a picture of the resident bloggers here (that would be one harried mama and one hysterical 16 year old who's panicking over her hair and skin tonight- and just decided she HAS to wear something that's in the laundry). 

So-o-o-o, this is going to be another reality post 

A look at our kitchen table set for dessert tonight.


What's for dessert, you ask??

By special request of our readers....


Yep! Chocolate chip ice cream sandwiches!

My family found it very amusing that so many of you asked for this recipe considering how I always try to find more "interesting" dishes to post. :)

Our placemats and napkins tonight are vintage 1950s


What can I say? I'm a retro kind of girl!

Square dinner plates act as chargers and pick up all the cool blues and greens


Turquoise bubble glasses and tall vintage green glasses for water and crushed fruit ice


These large glass dessert dishes have been around as long as the placemats!


I brought some mercury glass candle holders in from our porch because the colors worked so well


and always a cup for coffee


even ice cream needs a pretty table...


Chocolate Chip Cookies for Ice Cream Sandwiches
2 cups all-purpose flour
1/2 teaspoon baking soda
1/2 teaspoon salt
6 TBLS unsalted butter, melted
6 TBLSP butter flavored shortening
1 cup packed brown sugar
1/2 cup white sugar
1 tablespoon vanilla extract
1 egg
1 egg yolk
1 1/2 cups semisweet chocolate chips
1. Preheat the oven to 325°F. Line cookie sheets with parchment paper.
2. Sift together the flour, baking soda and salt; set aside. In a medium bowl, cream together the shortening, brown sugar and white sugar until well blended.
3. Beat in the vanilla, egg, and egg yolk until light and creamy. Beat in the melted butter. Mix in the sifted ingredients until blended.
4. Stir in the chocolate chips. Drop cookie dough 1/4 cup at a time for giant cookies ( I use a small ice cream scoop) about 3 inches apart.
5. Bake larger cookies for about 17 minutes until the edges are lightly toasted. Cool on baking sheets for a few minutes before transferring to wire racks to cool completely.
Soften a container of vanilla ice cream for about 10 minutes and put a scoop between 2 cookies. Roll edges in sprinkles if desired. Freeze till solid

I also want to take a second here to thank a very special reader/ follower. Emelia has been a devoted reader and commenter and we've become email friends- this has been one of the greatest bonuses of blogging- the wonderful friendships that we've been able to form.

Emelia and I had been "talking" about a couple of wonderful Greek recipes that I had managed to lose in our last move. This wonderful lady sent us a Greek cookbook compiled by her church! I am so excited! I have always collected community cookbooks when I find them- what's better than traditional recipes actually used by families like us!
Thank you so much Emelia!!!!

Join us tomorrow for Foodie Friday at Gollum's- we're working on a yummy treat for our photographer!
As Always,

Buon Cibo, Buon Amici,

Pattie and Allie